Vendor and Claimset Management
This is pre-release documentation for software that is not yet available.
This guide covers the management of vendors and claimsets in the Ed-Fi Admin App. Vendors represent third-party applications or systems that need access to Ed-Fi API data, while claimsets define the specific permissions granted to those vendors.
The Ed-Fi Admin App allows appropriately permissioned users to manage Vendors and Claimsets for the environments owned by their team. These directions outline steps to create and manage both of these resources.
Vendor Creation
-
Navigate to the
Vendorssection under Ed-Fi Environment > Ed-Fi Tenant.
-
If you have the appropriate permissions, you'll see the
+ Newbutton at the top right of the Vendors box. If not visible but expected, contact your system administrator.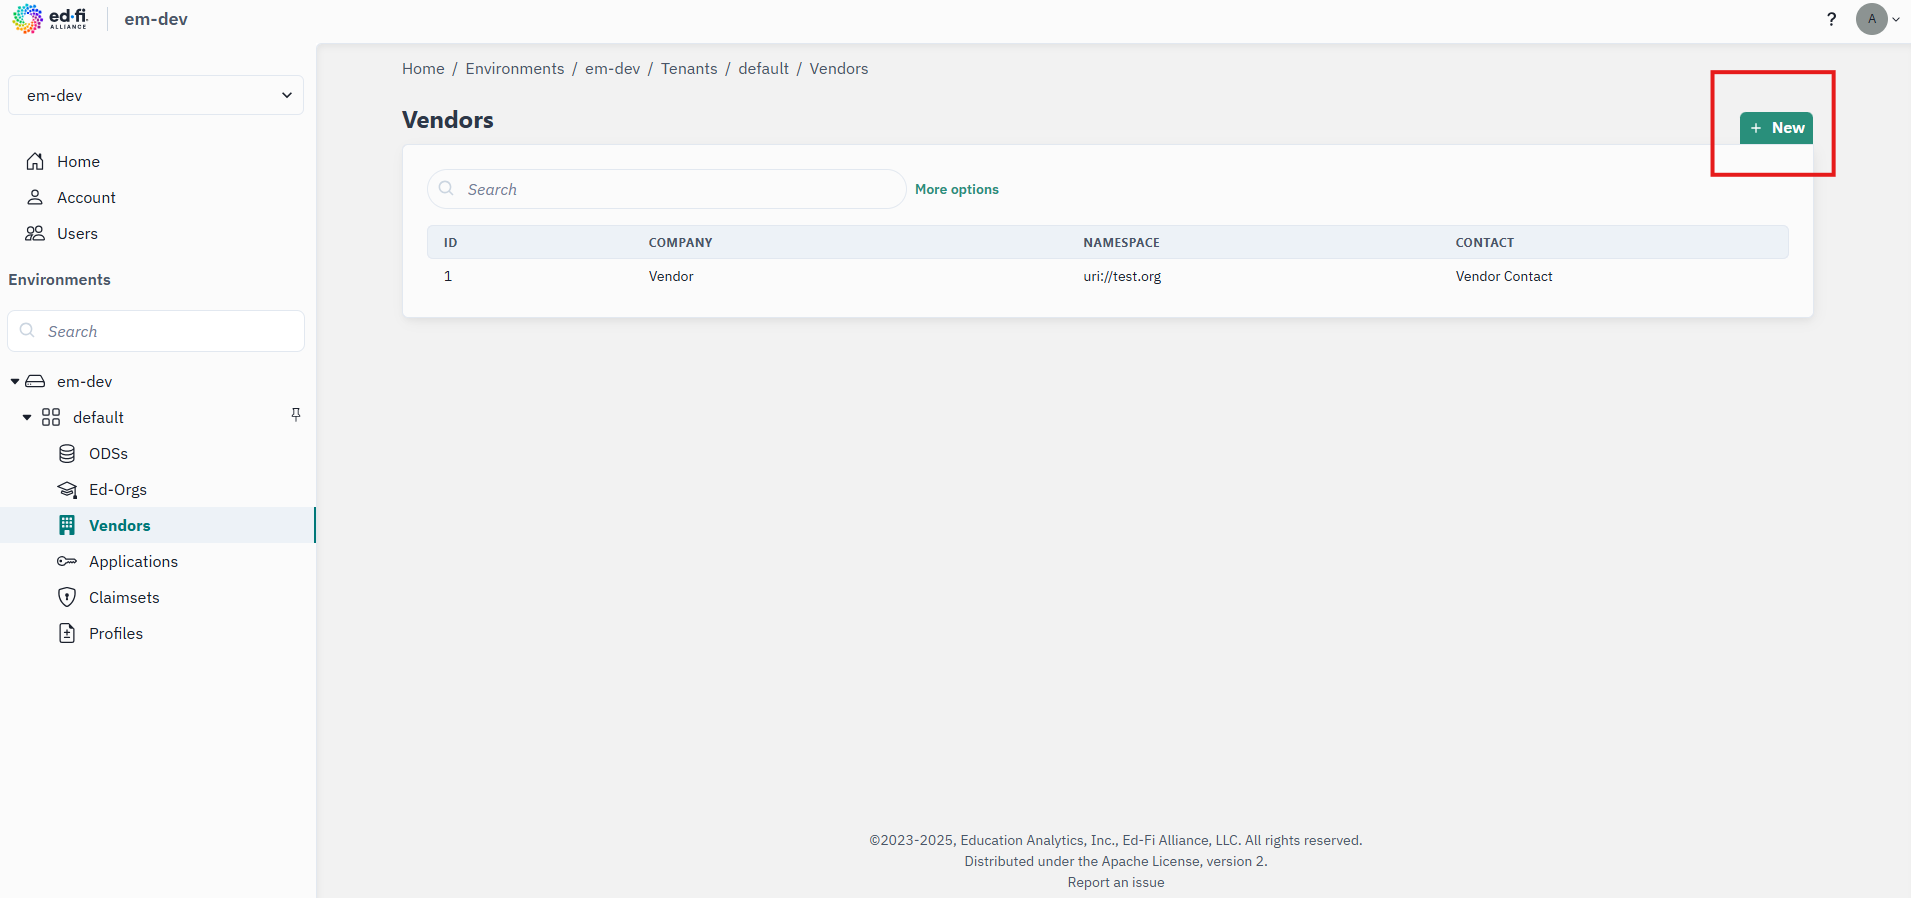
-
After clicking the
+ Newbutton on the vendors page, aCreate New Vendorform will pop up on the next page. To create a new vendor, you will need to enter the Company name, the Namespace prefix that governs data segmentation in the ODS, a Contact name, and a Contact email address. Your new vendor will be available to use after clickingSaveon the creation page.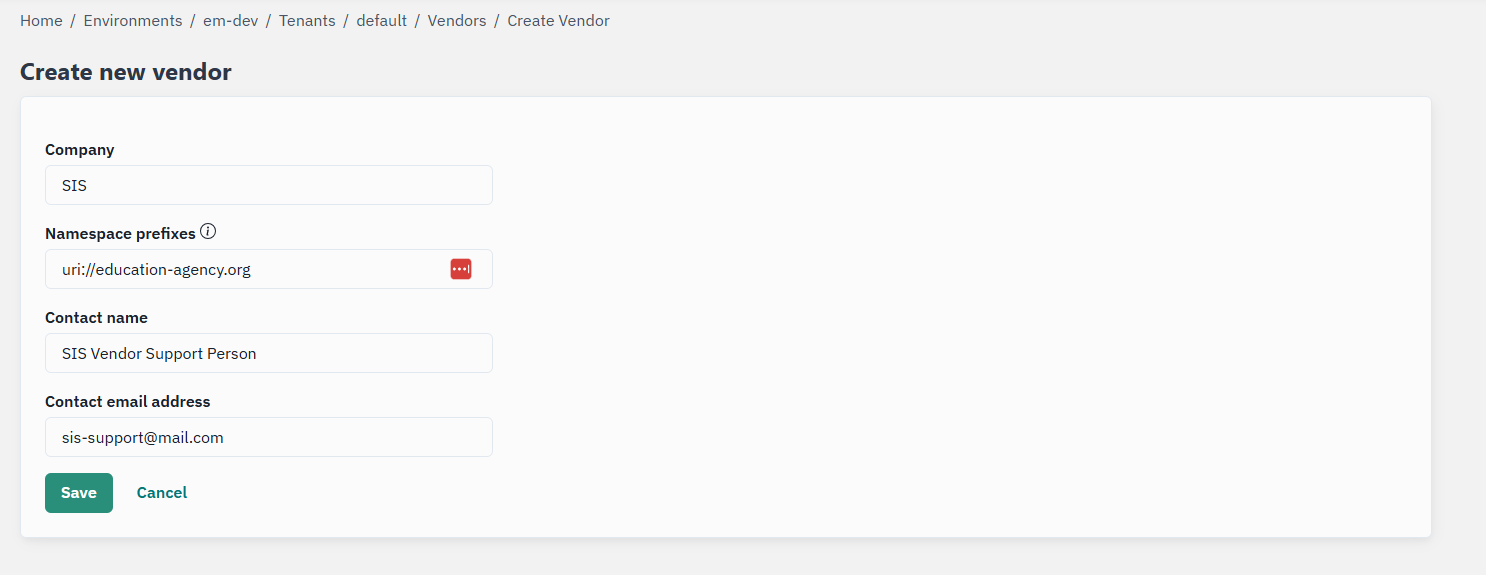
The Namespace prefix is a critical component that ensures data segmentation and prevents conflicts between different vendors' data in the ODS. Choose a meaningful and unique prefix that represents your organization or application.
Vendor Management
Admin App users also have the ability to manage (update and delete) vendors within their Ed-Fi Environments or Ed-Fi Tenants.
-
Navigate to the
Vendorssection under Ed-Fi Environment > Ed-Fi Tenant to view all existing vendors. -
To edit an existing vendor, click on the vendor name or use the edit option from the vendor's menu.
-
To delete a vendor, use the delete option from the vendor's actions menu.
Deleting a vendor will also remove all applications associated with that vendor. Ensure that all related applications are no longer needed before proceeding with vendor deletion.
Understanding Ed-Fi Components
Before creating applications and managing claimsets, it's important to understand the key components that make up the Ed-Fi API framework:
ODS: Operational Data Store. A database that holds operational data for the current school year in the Ed-Fi API. The data is stored in accordance to Ed-Fi Data Standard.
Tenant: A virtual environment that allows for the ability to locally control claimsets, vendors, and applications without impacting other tenants hosted in the same Ed-Fi Environment.
Resource: Each of the endpoints in the Ed-Fi API represents a resource. These resources are used by API clients to access domain specific data. These are what API clients interact with to retrieve, update, or manage data.
Vendor: A named entity that owns multiple applications within the system. They are the main link between applications and namespace prefixes. For example, a vendor could be the name of an assessment vendor (e.g. iReady or ACT), or a SIS vendor (e.g. PowerSchool).
Application: A software system or service that integrates with the Ed-Fi ODS/API to exchange educational data. Applications are owned by vendors and are assigned claimsets that define their permissions.
API Client Credentials: The client_id and client_secret (aka "key and secret") for authenticating with an Ed-Fi API application. For the ODS/API, these credentials are connected to an application. The ODS/API's security database supports multiple sets of credentials per application, as does ODS Admin API version 2.3. However, the Ed-Fi Admin App only supports a one-to-one mapping and treats the credentials as synonymous with the application itself.
Claimset: A collection of permissions (claims) that define what actions an application can perform on specific Ed-Fi Resources. Claimsets provide fine-grained control over data access.
For more detailed information about Ed-Fi security concepts, see the documentation here describing the different security concepts in Ed-Fi.
Claimset Management
Claimsets are fundamental to Ed-Fi API security, defining the specific permissions that applications have when accessing an Ed-Fi API. The Admin App provides tools to create, modify, and assign claimsets to applications.
Understanding Claims
Claims represent specific types of access that can be granted to an application:
- Create: Permission to add new data records to the ODS
- Read: Permission to retrieve and view existing data
- Update: Permission to modify existing data records
- Delete: Permission to remove data records from the ODS
- ReadChanges: Permission to access change tracking data and deltas
Creating Custom Claimsets
-
Navigate to the
Claimsetssection within your Ed-Fi Environment or Tenant. -
Click the
+ Newbutton to create a new claimset. -
Define Claimset Properties:
- Provide a descriptive name for the claimset
- Add a description explaining the claimset's purpose
- Select the resources that this claimset should have access to
-
Configure Resource Permissions:
- For each selected resource, specify the allowed actions (Create, Read, Update, Delete, ReadChanges)
- Consider the principle of least privilege when assigning permissions
- Review dependencies between resources
-
Validate and Save:
- Review all assigned permissions
- Test the claimset with a non-production application if possible
- Save the claimset configuration
When creating custom claimsets, start with the minimum required permissions and expand as needed. This approach reduces security risks and makes troubleshooting easier.
Pre-built Claimsets
The Admin App includes several pre-configured claimsets for common integration scenarios:
Ed-Fi Sandbox Claimset
- Comprehensive access for testing and development
- Includes read/write access to most Ed-Fi Resources
- Should only be used in non-production environments
SIS Vendor Claimset
- Designed for Student Information System integrations
- Includes access to student demographics, enrollment, and academic records
- Provides create/read/update access to core educational data
Assessment Claimset
- Specialized for assessment and testing applications
- Read access to student and school data
- Write access to assessment results and scores
Roster Only Claimset
- Limited access for learning management systems
- Read-only access to student enrollment and scheduling data
- Includes section and course information
Application Management
Applications represent the actual software systems that will connect to the Ed-Fi API. Each application must be associated with a vendor and assigned appropriate claimsets.
Creating Applications
-
Navigate to the
Applicationssection under your chosen vendor. -
Click
+ Newto create a new application. -
Configure Application Details:
- Enter a descriptive application name
- Provide application description and purpose
- Select the appropriate claimsets for this application
-
Generate Credentials:
- The system will generate a Client ID and Client Secret
- Securely store these credentials as they cannot be retrieved later
- These credentials will be used for API authentication
-
Configure Additional Settings:
- Set any applicable rate limits or quotas
- Configure monitoring and logging levels
- Define operational restrictions if needed
Client Secret Security
Ed-Fi Admin App has two configuration options for displaying the client credentials when an Application has been created:
- (default) Credentials are displayed directly on the screen for the user to copy and paste. The client secret is only displayed once during application creation.
- Alternatively, the system may be configured to use Yopass for managing a "self-destructing" one-time link. On application creation, the user is provided with a web link to access the credentials. The web link can be sent to another user so that they can take ownership over the credentials, without the initial (Admin App) user ever seeing or recording the
client_idandclient_secret.
In both cases, store the credentials securely and treat them as you would a password. If lost, you will need to regenerate the credentials using the reset button.
Managing Application Credentials
- Credential Rotation: Regularly rotate client secrets for enhanced security. Because the Ed-Fi Admin App only supports a 1-1 mapping of applications and credentials, key rotation can be achieved by either:
- Resetting the credentials for a given application, with immediate effect, or
- Create a second application, which creates a second set of credentials. Plan to deactivate the first set of credentials after giving the end user enough time to apply the new credentials in their system.
- Access Monitoring: Monitoring application usage and access patterns can help detect any malicious usage of the credentials. The ODS/API does not have support for this monitoring, see How To: Client Access Token Monitoring for one easy approach.
- Deactivation: At this time, the only way to disable an application without deleting it is to reset the credentials and do not share the new
client_secretuntil ready to do so. - Deletion: Permanently remove applications that are no longer needed.
Best Practices
Security Best Practices
- Principle of Least Privilege: Grant only the minimum necessary permissions.
- Regular Audits: Periodically review vendor and application access.
- Credential Management: Implement secure storage and rotation of API credentials.
- Monitoring: Track application usage and identify unusual patterns.
Operational Best Practices
- Documentation: Maintain detailed records of all vendors, applications, and their purposes.
- Testing: Use non-production environments to test new configurations.
- Change Management: Follow approval processes for claimset modifications.
- Backup: Maintain backups of critical configuration data.
Troubleshooting
Common Issues
Vendor Creation Problems
- Verify you have the necessary permissions in the selected environment/tenant.
- Ensure the namespace prefix is unique and follows naming conventions.
- Check that all required fields are properly completed.
Application Authentication Failures
- Verify the Client ID and Client Secret are correct.
- Check that the application is active and not disabled.
- Ensure the application's claimsets include the necessary permissions.
- Validate that the Ed-Fi API endpoint URLs are correct.
Permission Denied Errors
- Review the application's assigned claimsets.
- Verify that the claimsets include the required permissions for the specific operation.
- Check if there are any resource-specific restrictions.
- Ensure the application is accessing the correct tenant/environment.
Getting Support
For additional assistance with vendor and claimset management:
- Review the Ed-Fi technical documentation for detailed API specifications.
- Check application logs for specific error messages.
- Contact your system administrator for environment-specific issues.
- Consult the Ed-Fi community forums for best practices and troubleshooting tips.
Proper vendor and claimset management ensures secure and efficient integration between external applications and your Ed-Fi data, while maintaining appropriate access controls and audit capabilities.