AWS ODS/API Solution - Prerequisites
In order to launch the AWS solution for the ODS/API software suite, there are Prerequisites that must be completed. Failure to perform these steps, or perform them incorrectly, will result in a deployment failure of the solution in AWS. AWS is an Infrastructure-as-a-Service platform, and as such requires some user facing tasks to successfully bring an environment online. For example, AWS does not provide SSL certificates so the end user is responsible for creating them and providing them to the AWS Amazon Certificate Manager service for use in AWS. In an effort to limit the amount of tasks that a end user needs to perform in AWS in order to launch the ODS/API solution, the solution developed for AWS will perform as much of these functions as possible. However, there are a small number of tasks that must be performed by the end user before launching the first environment. This document explains these prerequisites and the steps to accomplish each one. Note that only one step would need to be performed more than once (SSL certificate).
The Pre-Requirements to launch the solution are listed below:
- Access to an AWS Account with an IAM user that has the proper permissions to provision all of the required resources.
- A S3 bucket located in your AWS account that can be used to store secure files.
- . A SSL certificate that is available in your chosen AWS region through the Amazon Certificate Manager (ACM) service. Please note that a self-signed certificate can be used for a Non-Production environment, but not for a Production environment. If using a self-signed SSL certificate the certificate and key will need to be uploaded into ACM.
- Increasing you AWS service limits for your AWS account
You will need to perform these prerequisites prior to launching your first ODS/API solutuon in AWS!
1.) Access to an AWS account with an IAM User with Administrator Privileges
The AWS solution requires the use of multiple AWS services with full privileges on each service. The quickest way to launch a solution is to use an IAM user that has Administrator privileges. You should never use the 'root' account of your AWS to launch resources and should use an IAM user. To create and add your account with the Administrator privileges, follow the AWS documentation steps outlined here
If you are not in control of your AWS account permissions, please contact your AWS administrator to obtain the proper permissions. Your IAM account needs to have full access to the following services to successfully launch the solution.
- VPC
- EC2
- ELB
- ACM
- KMS
- RDS
- Lambda
- AutoScaling
- S3
- IAM (permissions to create/delete IAM roles and policies)
- SSM Parameter Store
- CloudWatch
- CloudWatch Logs
If you do not have the required permissions, when launching the stack you will received a 'Permission Denied' error during an Event. You would need to work with your AWS administrator to have the proper permissions added to your account through the IAM service. You only need to do this step one time for your account, and then for each additional user that would launch the solution.
2.) Create a S3 Bucket in the US-EAST-1 Region
The AWS solution will use a S3 bucket that you have created to store the SSH Private Key file associated with your EC2 instances for each ODS/API environment that you launch. You should create this bucket within the US-EAST-1 AWS region to
Directions for performing this action, step-by-step, can be found on the AWS documentation site How Do I Create an S3 Bucket?
If you are familiar with AWS S3 administration, you can configure the S3 bucket to be accessible to all regions in the account using the proper IAM or S3 bucket policies and only use one bucket. When creating the bucket, it is advisable to not turn on public access. In addition, you should enable the option to version the bucket, and turn on access logging, and choose to encrypt objects in the bucket using the AWS S3 managed key.
Please note that you only need to do this one time as each environment launched can use the same bucket.
3.) Create or Import a SSL Certificate into the Amazon Certificate Manager service (ACM)
The AWS ODS/API solution requires SSL. There is no option to launch the solution without SSL. In AWS, an end user is responsible for their SSL certificates being made available in AWS to be used by services. To help users easily implement SSL certificates in AWS, the solution uses the Amazon Certificate Manager (ACM) service. This service allows users to create or import SSL certificates/keys into AWS to be used by services such as Elastic Load Balancing. This is the most prerequisite that requires the most work.
There are a few options available for SSL certificates in the AWS ODS/API solution and they are listed below:
- Use ACM to create a valid SSL certificate.
- Use ACM to import your valid SSL certificate, private key, and chain certificate that you already own for a domain name.
- Use ACM to import a self-signed certificate and key (for use by non-production environments only)
- Record the AWS ARN value of your certificate that is inside of the AWS ACM service.
The AWS ACM service provides free SSL certificates in a secure manner that can be renewed automatically (for option #1 above only). The SSL certificate should match the domain name of the anticipated ODS/API endpoint that would be provided to users of the solution.
You should create/import the SSL certificate in the same region that you will launch your solution. This means that if you will launch a solution in different regions, you will need to ensure that the SSL certificate is created or imported into the appropriate AWS region. AWS will not allow certificates that exists in one region to be used by services that are in another region.
Use ACM to create a valid SSL certificate
If you use ACM to create a SSL certificate, you can use this certificate in both Production or Non-Production environments. In order to create a certificate, you must be able to prove ownership of the domain that you are creating the SSL certificate for at the time. For example, if you wanted to use the domain name of ods-demo.ed-fi.org, you would need to be able to validate domain ownership for the domain ed-fi.org. You may need to obtain assistance from your IT department to complete this task. The steps for creating a certificate in the AWS ACM service are outlined in the AWS documentation steps identified below:
This is the recommended approach to securing a valid SSL certificate for a Production environment in the AWS ODS/API solution. It will renew automatically, and provides a secure management platform for your certificates.
Use ACM to import your valid SSL Certificate
If you already have access to a valid SSL certificate and key, you can alternatively import this into the ACM service to be used by the solution. You are still responsible for renewing the SSL certificate (which requires you to re-import the updated certificate at that time). The SSL certificate must be in PEM-format. The PEM format is the most common format that the Certificate Authorities issue. PEM certificates usually have extensions such as .pem, .crt, .cer, and .key. They are encoded in Base64 and contain -----BEGIN CERTIFICATE----- and -----END CERTIFICATE----- statements in the files. If your certificate and key files are not in PEM format, you will need to convert them into PEM format.
When importing into ACM, you will need the file contents of the certificate, key, and chain certificate. These contents are then pasted into the appropriate boxes of the import wizard in the ACM service. For instructions on how to perform this step, please see the following AWS documentation Import a Certificate - AWS Certificate Manager that provides step by step instructions.
Create a Self-Signed SSL Certificate and Import into ACM
If you have already have a self-signed SSL certificate and key, you can import those into ACM by following the instructions above Use ACM to import your valid SSL Certificate. If you need to create a self-signed certificate for use with a non-production environment, this can be accomplished a variety of ways. However, the most common method is to use the OpenSSL tool set. This tool set is installed by default on Linux and some MacOS platforms, and can be installed onto Windows platforms as well. For Windows, download the installer package from the Windows OpenSSL Download link (package name that will download is: Win64OpenSSL_Light-1_1_1g. Install the OpenSSL tools onto your WIndows platform. In addition, other operating system platforms that have binaries of OpenSSL available can be found on the OpenSSL Binaries page.
Linux / Mac System
If you are on a Linux or Mac system, to create your Self-Signed certificate, open a command prompt on your local system, and type the following command:
openssl req -newkey rsa:2048 -nodes -keyout private_key.pem -x509 -days 365 -out certificate.pem
You are free to use different values for private_key.prm and certificate.pem. It is advisable to use descriptive names instead with your domain name. For example, if you were creating a self-signed certificate and key for the URL of edfi-demo.mydomain.com you would use edfi-demo.mydomain.com.pem and edif-demo.mydomain.com.pem for your values.
Upon entering the command above, you will be presented with an interactive tool to fill in values.
- Country Name (2 letter code):
[AU]: - State or Province Name (full name):
[Some-State]: - Locality Name (eg, city):
[City Name]: - Organization Name (eg, company):
[Internet Widgets Pty Ltd]: - Organizational Unit Name (eg, section):
[Accounting]: - Common Name (e.g. server FQDN or YOUR name) [iwidgetspty.com]:
- Email Address
[someone@example.com]: Many of these can be left blank, but the one filed that is required is the one labeled Common Name (e.g. server FQDN or YOUR name) []:
This value should be a domain URL. For the ODS/API solution,and a non-production environment, this value simply needs be in the format of a valid domain URL name. In the previous example, if I wanted to simply identify this certificate with edfi-demo.mydomain.com, my value would look like below:
Common Name (e.g. server FQDN or YOUR name) []: edfi-demo.mydomain.com
Once you exit the wizard, you will have two files in your current directory: a private key, and a certificate. They will be named with the values you used in your openssl command for the parameters -keyout and out. If you open these files, you will see the text that contains the PEM-formatted text blocks. You can now import your Self-Signed SSL certificate and key file into ACM using the instructions at Use ACM to import your valid SSL Certificate.
Windows System
If you are on a Windows system, you can open the OpenSSL binary to run the previous 'openssl' command by doing the following:
- Open Windows File Explorer.
- Navigate to the OpenSSL bin directory
C:\OpenSSL\bin\in our example. - Right-click the
openssl.exefile and select Run as administrator. - Enter in the command:
req -newkey rsa:2048 -nodes -keyout private_key.pem -x509 -days 365 -out certificate.pem - Enter the information in the tool as shown in the Linux process above.
- Once completed, you will find the
certificate.crtandprivateKey.keyfiles created under the\OpenSSL\bin\directory.
It is important to note that for a non-production ODS/API solution in AWS, you can use the same self-signed certificate for multiple nonprod type environments in the same AWS region. You do not need to create a self-signed certificate for each nonprod type environment.
Copying your ACM ARN for your SSL Certificate
Once your certificate exist in the ACM service, you will need to copy or record what is know as its ARN value. This ARN value is a unique identifier inside of the ACM service for your SSL certificate that is used across AWS services. You will need to supply this ARN value to your CloudFormation template when launching an environment. To obtain your ARN value for your certificate, perform the following:
-
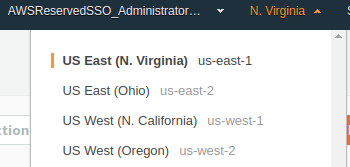
Login to the AWS Management Console. Ensure that you are in the AWS region that you imported your SSL certificate by looking in the top right corner of your browser.

-
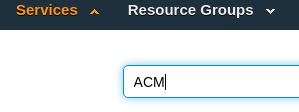
Navigate to the ACM service by clicking *Services and typing
ACM.
-
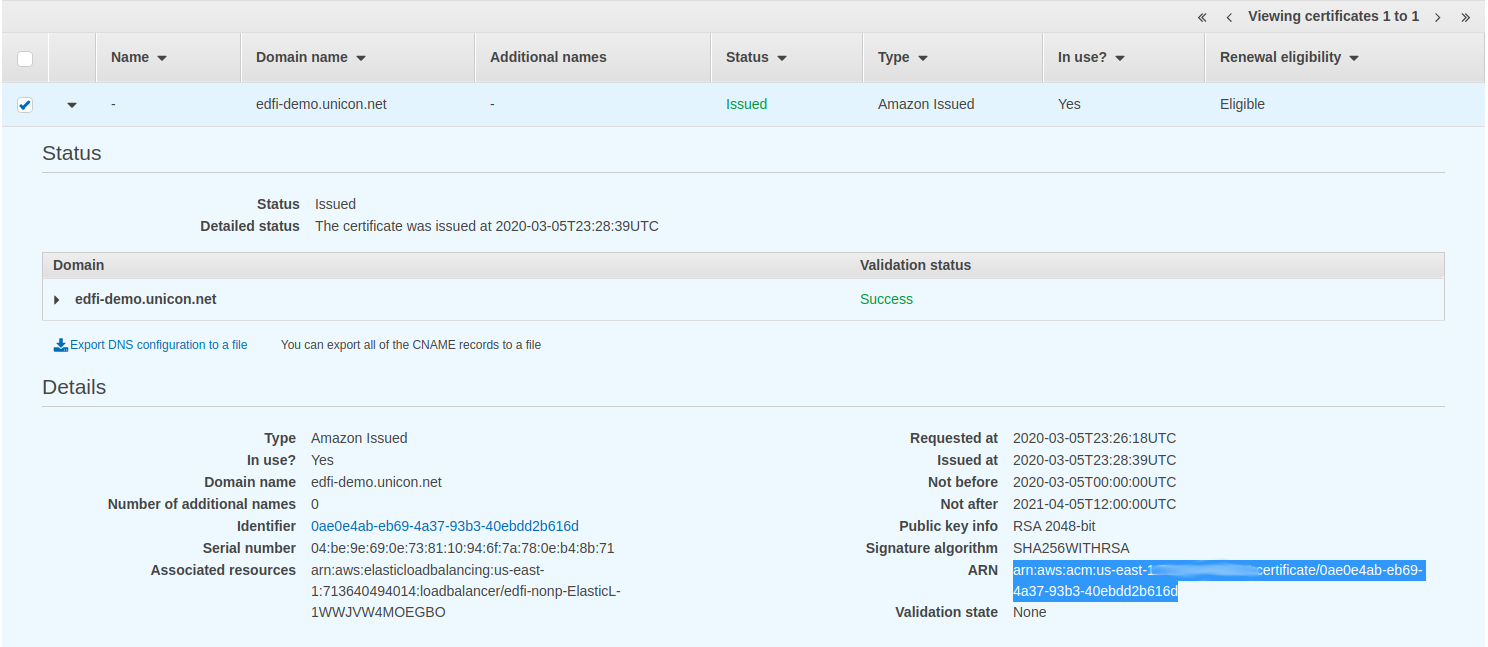
Once in the ACM service, click on the domain URL of your certificate and expand to see it details. In this example, the SSL certificate is named
edfi-demo.unicon.net. In the details area, look for the ARN label and copy the entire value that is next to it and store it in another location to be referenced when you launch your solution.
4.) Increase your AWS Service Limits in the AWS Regions
By default, AWS enforces limits on the amount of resources you can launch in any given AWS Region. The current default AWS account limits, will allow you to run only one ODS/API solution per region. In order to run more than one deployment in a region, within a single AWS account, you will need to request a service limit increase for your AWS account. The most important limit to increase right away is the Elastic IP Address (VPC) service. By default, this limit is 5, and one ODS/API solution will use 3. Increasing your service limits is as simple as submitting a request through the AWS support link when logged into your AWS account.
- Login to your AWS Account
- Request Service Limit Increase
- Complete the form for the service you wish to increase, and submit the case. Service limit increase usually are granted fairly quickly, and you will receive an email from AWS when the limit is raised.
The table below provides the requirements concerning the AWS services and the ODS/API solution. Please review the table below for additional information on raising these limits.
Resources
If necessary, request service limit increases for the following resources. You might need to do this if you already have an existing deployment that uses these resources, and you think you might exceed the default limits with this deployment. For default limits, see the AWS documentation.
AWS Trusted Advisor offers a service limits check that displays your usage and limits for some aspects of some services.
The number of resources deployed depends on the type of environment selected during the launch process (non-prod or prod):
| Resource | Non-Production deployment | Production deployment |
|---|---|---|
| VPCs | 1 | 1 |
| Elastic IP Addresses | 3 | 3 |
| Security Groups | 5 | 6 |
| IAM roles | 7 | 7 |
| Auto Scaling Groups | 1 | 3 |
| Application Load Balancers | 0 | 1 |
| Classic Load Balancers | 1 | 1 |
| EC2 Windows Instances | 2 | 4 |
| RDS Instances | 1 | 1 |
| SSM Parameters | 4 | 4 |
| CloudFormation Stacks | 12 | 12 |
| KMS Key | 1 | 1 |
| Amazon Certificate Mgr | 1 | 1 |
Please ensure that your AWS account limits are set at appropriate levels to ensure that multiple environments could be launched in an account. For example, the default limit of Elastic IP addresses is 5. Without an increase in this limit, you would only be able to launch one environment in the account per AWS region.