AWS ODS/API Solution - Launch a Production Environment
This section describes how to launch the AWS ODS/API solution in a Production environment. If you have not read the Ed-Fi ODS/API Cloud Deployment for AWS - Deployment Guide, please do so now to become familiar with the solution and options available such as the environment types and AWS specific options.
A Production environment is suitable for using the ODS/API the software with third party systems, and for actual data retrieval. There are extra steps to take to allow a production environment to be launched. Particularly, you will need to provide a valid SSL certificate that will match the URL that you configure for the ODS/API software. In addition, you will need to be able to edit the DNS server entries for your provided URL to the ODS/API. When you access the ODS/API endpoints, they will not present any SSL certificate warnings. However, the Admin Application will still present a SSL certificate warning, and this is to be expected as at present the Admin Application requires a self-signed SSL certificate to be installed in its setup process. The traffic to the Admin Application server is still encrypted. If you are familiar with managing SSL certificates for Windows and IIS, you are free to placed a valid certificate inside the Admin Application IIS site, and create a DNS entry for its endpoint. However, this Admin Application change is not required to launch the solution in a production environment configuration.
You may also launch a production environment as a test environment, using the 'small' option that would allow you to use the solution with third-party systems. For example. you may desire a Stage environment that needs to communicate with other data source providers tests environments. These normally require a site that provides a valid SSL certificate and URL name. With the options provided in the launch process, you can setup a system such as this and not enable any of the high availability, fault tolerance, or scaling features that you may enable for a true production environment. It is highly recommended that you are familiar with Amazon Web Services (AWS), the costs of AWS services, the AWS solution launch process for the ODS/API, creating SSL certificates, working with DNS software to modify entries for a URL domain, and are familiar with the ODS/API software suite as a whole prior to launching a production environment. If you need to see the process in action and work with the solution, please see the AWS ODS/API Solution - Launch a Non-Production Environment page before launching a production environment.
The AWS solution for the ODS/API software suite will provide the options to give you a highly available ODS/API server layer, so that if one ODS/API server fails, another is always available. In addition, any failed ODS/API server will automatically be replaced and setup according to your configuration. The database backend can be enabled to provide a synchronous replica that will automatically be used in the event the primary database fails in any way; in the event of a failure a new replica will automatically be synced to the new master database as well. In addition, you can also configure the ODS/API servers to use auto-scaling to add capacity to the ODS/API servers for any unexpected load increases. Servers are added and removed based on the CPU Utilization of the ODS/API servers as a group.
For Users of v5.0.1
If you are installing ODS/API v5.0.1, you MUST perform STEP 8 on this page in order for your solution to work. ODS/API v5.0.1 is administered through a newer version of the Admin Application (Suite 3 v2.0.1). If you fail to to step 8, you will receive a 500 error in your browser until you perform Step 8.
Installation Instructions
This section provides step-by-step instructions for launching the AWS ODS/API Solution in a Production environment. Be sure to visit the FAQ page if you encounter an issue with setting the solution up.
- Step 1: Prerequisites
- Step 2: Select your Solution Template
- Step 3: Enter your Solution Options in the Parameter Sections
- Step 3 (Optional): Enter your Existing VPC Information
- Step 4: Complete the CloudFormation Launch Process
- Step 5: Monitor the Progress of the Solution Launching Process.
- Step 6: Gather your ODS/API Endpoints and DNS Values
- Step 7: Edit your Domain's DNS Server to Add the ODS/API Endpoints for use with SSL.
- Step 8. Download your SSH Private Key File from S3
- Step 9. Access the Admin Application to configure the ODS/API software
- Step 10. Test ODS/API Software Solution
Step 1: Prerequisites
In order to launch the ODS/API AWS solution, there are three steps that must be taken to that are the responsibility of the user launching the solution:
- Access to an AWS account that has the proper permissions to launch the solution. It is recommended that a user with 'Administrator' permissions in the AWS account launch the solution.
- A S3 bucket located in your AWS account that is used to store secure files.
- A SSL certificate that is available in your chosen AWS region through the Amazon Certificate Manager (ACM) service. This must be a valid SSL certificate that will server the URL name that you are providing the ODS/API for the environment . For example, if you were planning on using the URL of
https://demo.ed-fi.org, you would need to have a SSL certificate for thedemo.ed-fi.orgdomain.
If these requirements are not met, the deployment will fail. Please ensure that these are completed prior to continuing with this document. For information on performing these steps, please see AWS ODS/API Solution - Prerequisites.
Step 2: Select you Solution Template
The first decision to be made is if you will be launching the solution in a new VPC (networking infrastructure), or an existing VPC in your AWS account. Unless you have been working with AWS and understand how to setup a VPC, choose the option to deploy the solution into a "new" VPC.
-
In a separate browser tab, sign in to your AWS account with an IAM user role that has the necessary permissions. An IAM Role with Administrator Access provides the quickest way to launch the solution.
-
Click on your preferred "Deploy" option link below to launch the appropriate AWS CloudFormation template for your environment. This will automatically open the template in the AWS CloudFormation service in another browser tab.
Option 1: Deploy the Ed-Fi ODS/API into a New VPC on AWS
Option 2: Deploy the Ed-Fi ODS/API into your Existing VPC on AWS
After clicking one of the links above, your window will look similar to the one below:
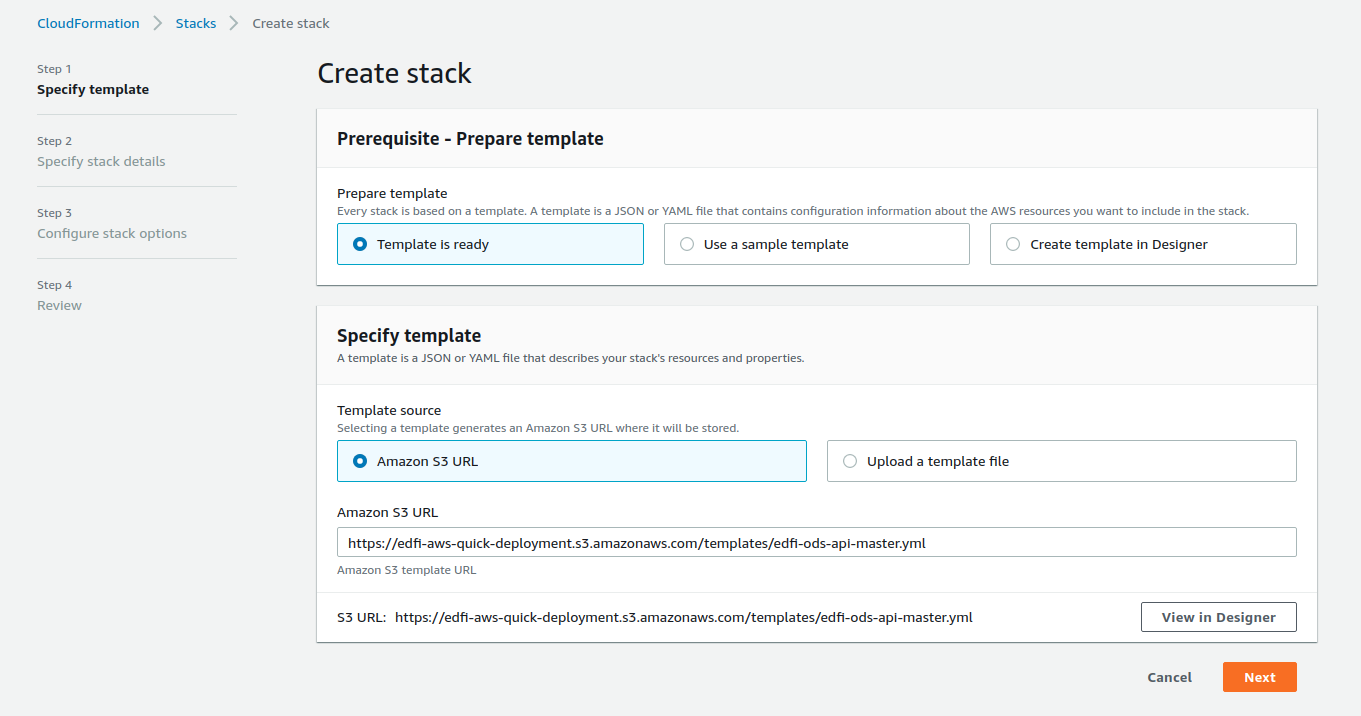
-
Check the AWS Region that’s displayed in the upper-right corner of the navigation bar, and change it if necessary. This is where the network infrastructure for Ed-Fi ODS/API will be built. By default, the template is launched in the US East (N. Virginia) Region . At this time, the Ed-Fi ODS API AWS Solution can only be deployed into the following AWS Regions:
a.) N. Virginia (us-east-1)
b.) Ohio (us-east-2)
c. ) Oregon (us-west-2)
-
On the Select Template page, keep the default setting for the template URL, and then choose Next.
Step 3: Enter your Solution Options in the Parameter Sections
Next, you will be required to enter in parameters for your environment to get up and running. Follow the steps outlined below, taking note of parameters that require input. If you need further information on each parameter, please see the Parameter Options. Please note that you will need your S3 bucket name and AWS Amazon Certificate ARN value that you have recorded when ensuring that your Prerequisites were completed. If you are launching the solution into an existing VPC within your AWS account, you will be required to also enter in your networking information after the standard parameters for a production environment are entered.
Your window should look similar to below after completing Step 2 above:
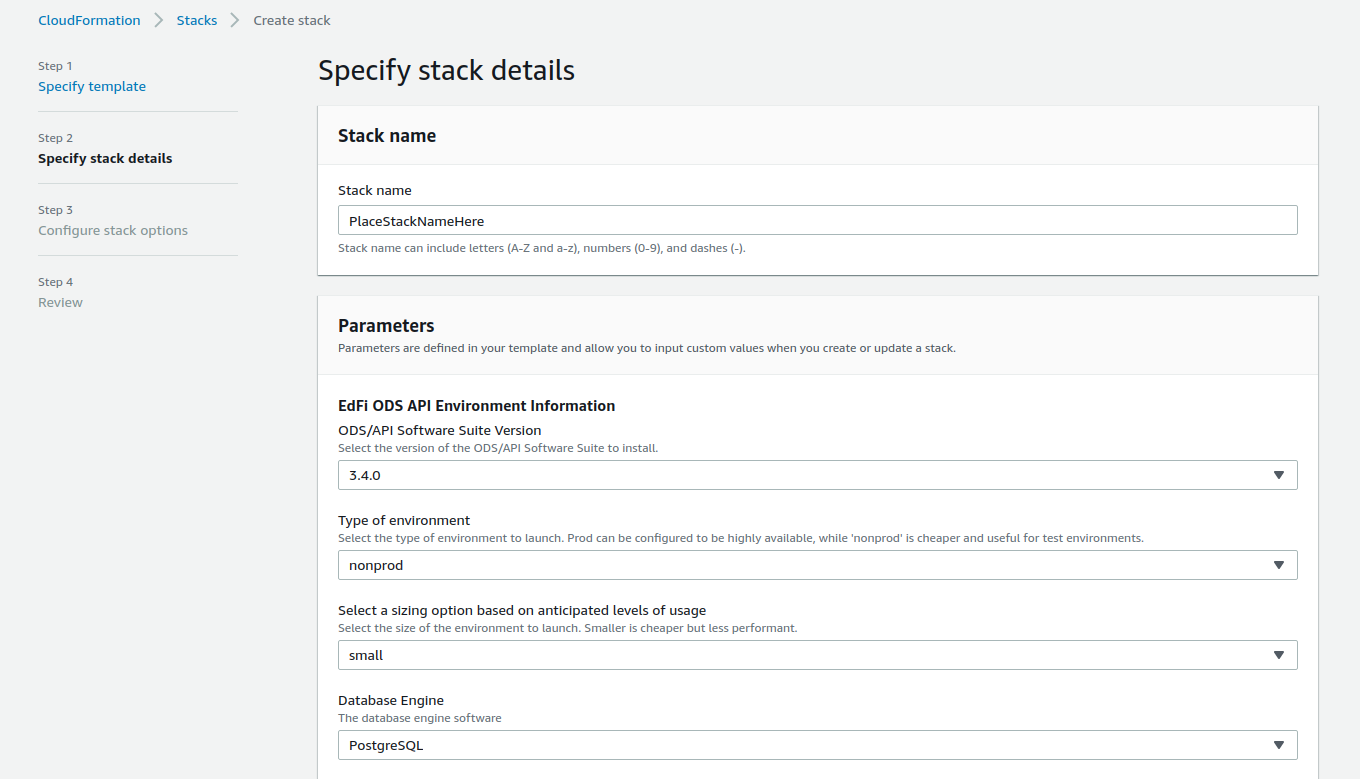
- Provide a Name for the Stack. Replace the text
PlaceYourStackNameHerein this field with your unique stack name. Record this name value, as it will allow you to review the status of the creation process. - For the
ODS/API Software Suite Versionparameter, select the value of3.4.1. or5.0.1depending on your preference. - For the
Type of environment parameter, select the value ofprodin the drop-down list. - Choose a sizing option for your deployment. You cannot change this value after launching, so please ensure that your sizing option is appropriate. For further details on the sizing options, please see the Cost and Licenses section of the Overview of the Solution
- Select your preferred Database engine. The default is
PostgreSQLand will be the lower cost option. However, you can selectSQL Serverif you wish. - For the parameter
Label Your Environment, provide what will be a unique label identifier for your environment. Please note that only one value can exist per solution launched.

- Next, select (2) AWS Availability Zones from the drop down list provided in the parameter. Click outside anywhere of the drop down box to return to your Parameter page.

- For the parameter labeled
The ARN of the SSL Certificate ID, you will copy in your own value for your certificate that exists in the AWS ACM service. Ensure that no white space is before or after the value.
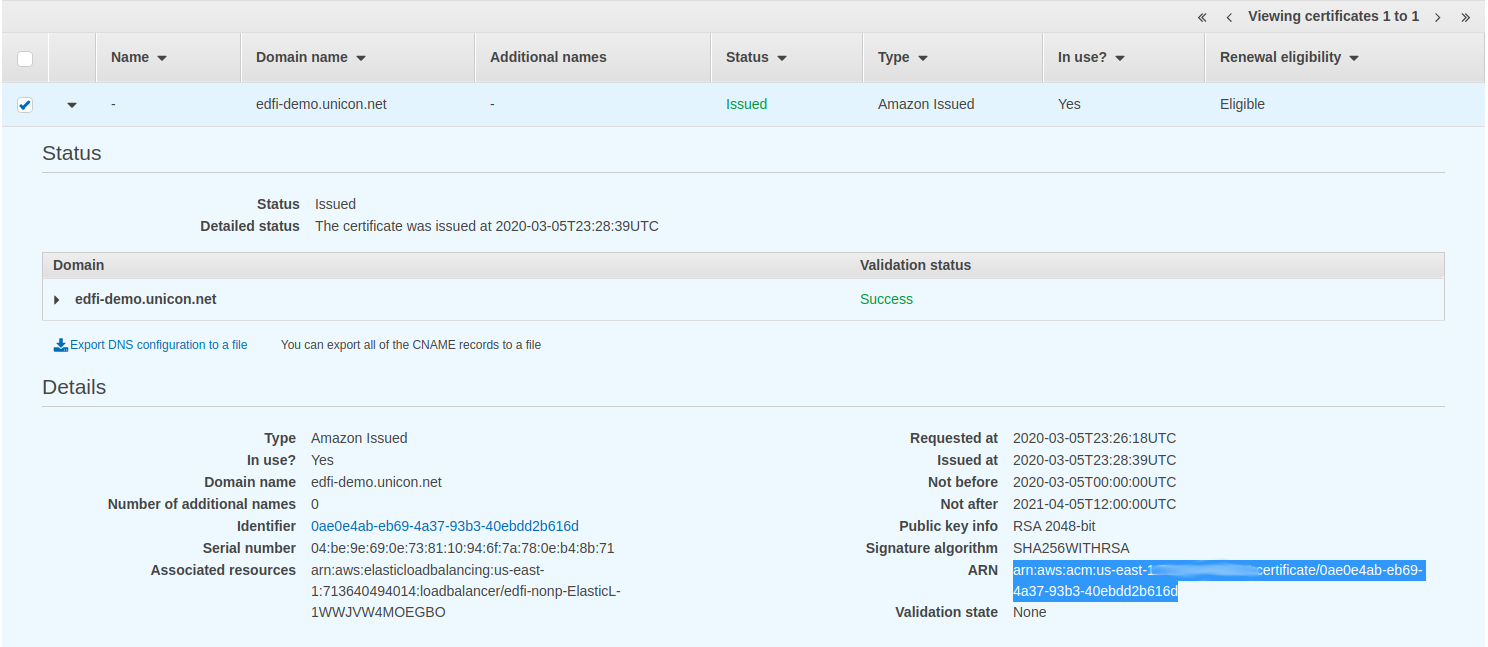
- Next, for the parameter labeled
S3 location to store your own secure files, copy in the S3 bucket name you provided from the Prerequisites.

- For the parameter of
Initial ODS API Database Data Set, selectpopulatedorminimaldepending on your desired database state after setup.

- For the parameter of
Install the SwaggerUI into the environment, select eitheryesornofrom the drop-down list. For production environments, it is recommended that this be set tono.

- The next three parameters that you enter will be the administrator passwords for your database, and RDP account to access the servers. Password requirements are provided in the parameter description.

- The next parameter that you will need to enter is a Public Network IP Address Space that allows access to the Remote Desktop Gateway Server to allow you to access the servers if needed. You may need to obtain your trusted network address space from your network administrator. If you wish to simply use your local machine's IP address, you can type into Google the phrase
what is my ipand this will give you your current IP address. Take this address and append a/32to its value to complete this parameter. For example, if your IP address is3.4.5.6, the value you would enter is3.4.5.6/32in the field. However, for a non-production environment, you can place the value of0.0.0.0/0to allow connections from anywhere to get started, but it is recommended to limit access to this server if possible.

- Next, you will enter in parameters for your Production environment. The section of parameters will look like below
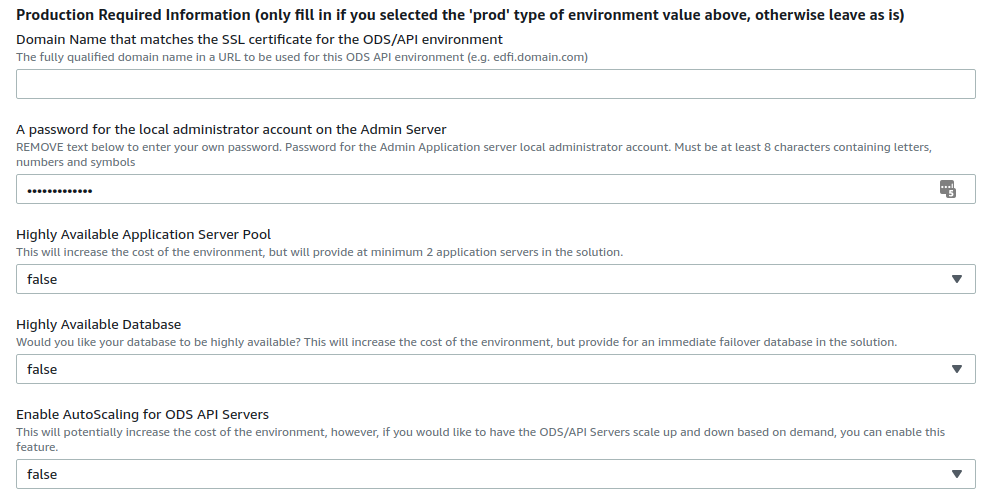
-
Enter the Domain Name that matches your SSL certificate that you will be assigning to the ODS/API environment (e.g demo-ed-fi.org). This value must match a valid domain name presented by your SSL certificate.
-
Remove the asterisks for the password that is to be assigned to your Admin Application Server in the environment. After removing the **** values, enter in your password to be set on the Admin Application server to allow RDP connections.
-
Configure the
Highly Available Application Server Poolsetting. Atruevalue will ensure that two servers are always available for the ODS/API. Afalsevalue will ensure that one server is always online (and recover automatically if it fails). -
Configure the
Highly Available Databasesetting. Atruevalue will set the RDS into aMultiAZconfiguration, providing a synchronous replica that can take over in the event of a failure. Afalsesetting does not provide a replica. -
Configure the
Enable AutoScaling for the ODS API Serverssetting. Atruevalue will add or remover servers to your web tier if the load on the servers is above or below a threshold. Afalsevalue will not enable any automated scaling. -
If you are launching in a new VPC, all other templates can be left
as-isand you can move to Step 4. If you are launching inside of anExisting VPC, please move to the optional Step 3 area below.
Step 3 (Optional): Enter your Existing VPC Info
If you are launching the solution inside of a VPC that you already have created in the AWS account, you will need to enter its information into the following parameters. If you are launching in a new VPC, you can skip this section and move to Step 4. When launching in an existing VPC, your VPC needs to meet the following requirements as listed in the bottom of the Parameter Options page. If you are using this option for deployment, it is assumed that you are familiar with AWS VPC concepts. The parameters you will need to fill are shown in the window below:
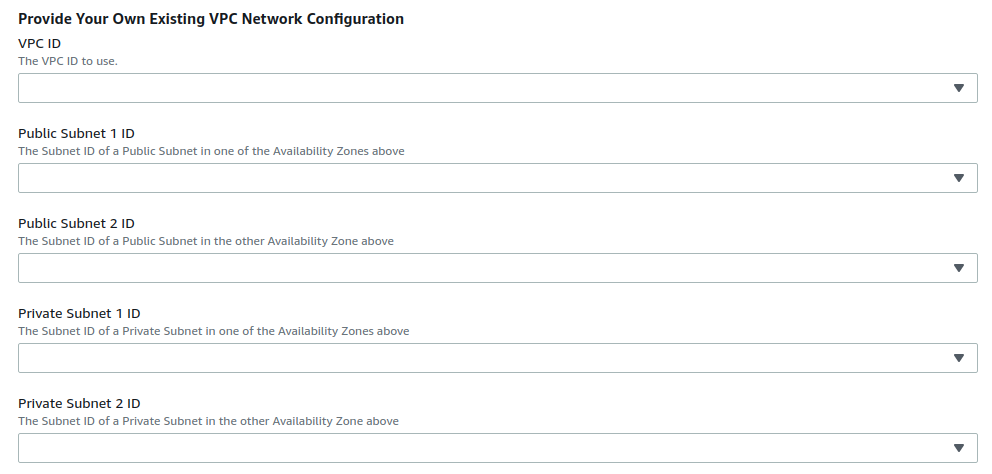
- Select your VPC ID value from the drop down list.
- Provide the Subnet ID for a
Publicsubnet in the first Availability Zone of the list you selected in theAvailability Zonesduring parameter entry earlier. Please note that the definition ofPublicis that the subnet assigned Public IP addresses automatically and can access the Internet through an Internet Gateway. - Provide the Subnet ID for a
Publicsubnet in the second Availability Zone of the list you selected earlier. - Provide the Subnet ID for a
Privatesubnet in the first Availability Zone of the list you selected. APrviatesubnet is defined as a subnet that is not exposed to the public internet and accesses the Internet through a NAT gateway in the VPC through its route table. - Provide the Subnet ID for a
Privatesubnet in the second Availability Zone of the list you selected. - After entering these parameters, your can leave the remaining parameters
as-isand move on to Step 4.
Step 4: Complete the CloudFormation Launch Process
The next step is to navigate the remaining CloudFormation windows and launch the solution. You do not need to enter anything in the window and only need to check two boxes on the final window. Follow the steps below to complete this step.
-
On the window named
Configure Stack Options, scroll down to the bottom and click the orangeNextbutton. -
In the
Reviewwindow, you are presented with a change to review your settings. Scroll to the bottom of the page. At the bottom of the page, there is a blue box under the wordCapabilities. Check the two boxes as shown below: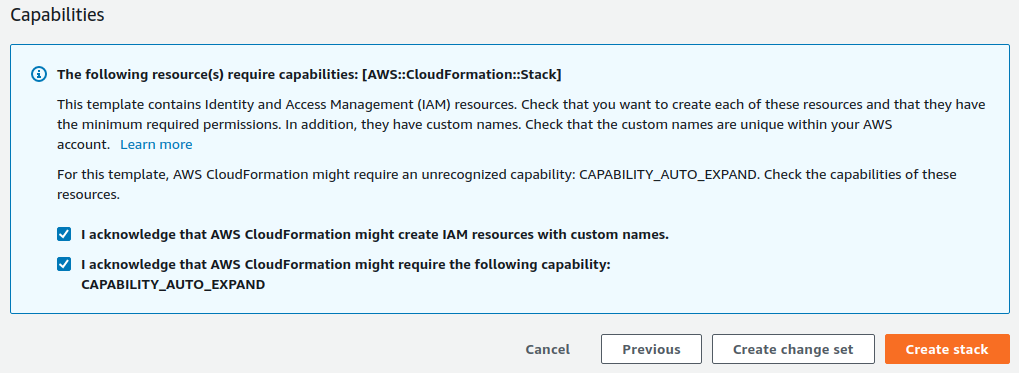
-
Click the orange
Create Stackbutton to launch the solution.
Step 5: Monitor the Progress of the Solution Launching Process
At this time, your solution is now launching inside of your AWS account. The solution will take approximately 1 hour and 15 minutes to complete the process. You should monitor the progress of your solution launching, by following the steps below.
-
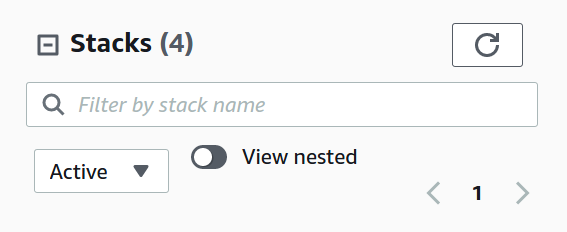
You can set the CloudFormation console to show only your Main Stack by flipping the ‘View Nested’ option in the console. If you wish to see each nested stack that is being launched, you can toggle this switch.
-
Monitor the progress of the stack creation. The stack name to monitor will be the name you provided in Step #3, for the
Stack Nameparameter. While the solution is launching, it will show a message ifIn Progress. When the status of this stack is CREATE_COMPLETE, the Ed-Fi ODS/API environment is ready. An example of a stack that was namededfi-demothat has completed is shown below: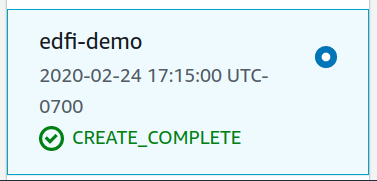
-
When the stack has finished launching, you can move to the next step.
Step 6: Gather your ODS/API Endpoints and DNS Values
After your solution has launched, you will need to gather your URL endpoints to access your ODS/API and the Admin Application. To obtain these endpoints, perform the following steps:
-
Select the CloudFormation stack that you have been monitoring. On the ‘Stacks’ list, scroll down to the master template stack name that you have been monitoring in the previous step. Select the radio button next to the stack name in the box. The details of the stack will show in the right pane of the window. Your window would look similar to below:
-
Click the Outputs tab to view the environment URLs. In this tab will be three URLs to view and record their values(do not click any yet). They are labeled in the outputs tab as follows:
- AdminAppProdURL
- OdsApiProdURL
- SwaggerUIProdURL (if applicable)
Step 7: Edit your Domain's DNS Server to Add the ODS/API Endpoints for use with SSL
Prior to moving on in the setup process, you will need to enter the ODS/API AWS endpoint into your DNS to match the domain name of that you have assigned. You may need to contact your DNS administrator to perform this step. The type of DNS entry that will be added is a CNAME. In DNS terms, you will be creating a CNAME entry for your domain name to the AWS endpoint provided in your Output tab.
In the Outputs tab of the main CloudFormation stack, copy the value next to the label OdsApiDnsName. Edit your DNS system to add a CNAME entry using the values below:
- DNS Record Name =
<The Domain Name value entered in your parameter field> - DNS Record Type =
CNAME - DNS Value =
<OdsApiDnsName >
If you do not add this DNS entry to your DNS systems, the production environment will not function. For help with how to add a DNS entry, please contact your DNS administrator or DNS provider help system.
Step 8. Download your SSH Private Key File from S3
In an effort to limit the amount of technical requirements in launching this solution, the launch process will create a SSH Key Pair for you to assign to the EC2 instances. The private key file of this key pair is stored in the S3 bucket that you provided in your template. You should download this file from the S3 bucket and store it in a safe location, following your security policies for handling a secure file. This file can be used to obtain the Windows Administrator password (not to be confused with the account named ‘LocalAdmin’ that the solution creates on each server) for the EC2 instances.
Step 9. Access the Admin Application to configure the ODS/API software
The next steps involved using the actual software. The first step is to login into the Admin Application and configure the ODS/API server. The minimum required steps are below. For more detailed instructions on using the Admin Application, please see the Ed-Ft Technical documentation on the Admin Application Guide.
- In the
Outputstab labeledAdminAppProdURL, click the link provided. You will need to accept the SSL certificate warning in your browser to proceed, as the Admin Application installs itself with a self-signed certificate. The Admin application takes about 20 seconds to load the first time, but when it does you will be presented with a login box. As this is the first time to use the application, you will need to create a user account. Click the linkRegister as a new user - Enter the required information to create your account. Please note that this will be an Administrator level account and should be treated appropriately.
- After creating your account, you will be redirected to the final setup page of the Admin Application. Click the
Continuebutton to proceed. Do not leave this web page until the final setup process completes. - Once the setup processes completes, you will be redirected to the Admin Application configuration pages. At this point, you can add Vendors and Applications to obtain API Keys for use with the ODS/API software that was launched.
- You will be required to restart the ODS/API IIS site to continue using the software.
Restart Required!
Prior to continuing, due to the Admin Application inserting required security data into the Admin database during its setup process, the ODS/API needs to be restarted. This is accomplished by restarting the IIS server on an ODS/API server in the solution. For details on connecting to the servers in this solution, please see the section titled Accessing the Servers.
Steps for restarting the ODS / API:
- Open
IIS Manager(inetmgr) on an ODS/API Server. - In the Connections pane on the left, expand
Sitesand locate theDefault Web Sitesite - Right-click the website and select
Manage Website > Restart - Close the IIS Manager (inetmgr).
For production environments, the ODS/API software is located on separate servers than the Admin Application. They can be identified in the EC2 Console by looking for a Name value that contains your stack name and Application Server.
PLEASE NOTE THAT IF YOU ARE INSTALLING ODS/API v5.0.1 YOU MUST PERFORM THIS RESTART OF IIS!
Step 10. Test ODS/API Software Solution
The environment is now ready to be tested and used. It is highly recommended to test your entire environment in a validation manner. Please see AWS ODS/API Solution - Steps for Quick Validation of Solution in AWS to work with the environment for the first time.
If you have encountered any issue or would like some more information on the solution, please see the AWS ODS/API Solution - Frequently Asked Questions page.
Next Steps
Once your environment is up and running on AWS, information on using the software can be found in following the links in Step 8 above.
Further support on using the Ed-FI ODS/API solution can be obtained at the Ed-Fi Alliance website. In addition, technical support is available. Information can be found in the AWS ODS/API Solution - Frequently Asked Questions page.
Accessing the Services
To access the servers that are launched, you must RDP to the Remote Desktop Gateway server using a RDP client. You can connect to this server by using its IP address that is obtained from the Outputs tab from the name RemoteDesktopGatewayIP.
From this server, once connected, you can use the Remote Desktop program on this server to connect to each server launched in the solution. The username for all servers is LocalAdmin and the password is the value that you typed into the CloudFormation parameter window for each type of system.
The solution also stores a copy of the passwords that you entered within your CloudFormation parameters inside the AWS Systems Manager Parameter Store service. To access this area, search for the SSM (Systems Manager) service in the AWS Management Console. Click the Parameter Store link on the left side menu. You will see entries for your passwords that you entered. You can identify an environment`s password by looking at the name and matching the final word in the name to the environment label that you put into the CloudFormation template values.
You will need to obtain the internal IP address of the ODS API Application Server and the Admin Application server to remote desktop into the systems. To obtain this information, go to the EC2 service of the Management Console. Click Instances. Each server can be identified by its value in the Name field. Click the checkbox next to an instance and in the window that appears in the bottom half of the page, look for the Private IP value: A non-production environment only has one server with both the ODS/API software and Admin Application installed. In a production environment, there is a single server for the Admin Application, and one or more ODS/API servers.
Once connected to the Remote Desktop Gateway Server, click the Windows icon in the lower left corner, and select the Remote Desktop application. In the resulting window, enter in a server's internal IP address (10.x.x.x) to connect to the server. The username is LocalAdmin and the password is the one you entered in the CloudFormation template for the respective server
You must connect to the ODS API server or Admin Application server by first connecting to the remote desktop gateway server. These servers are not directly publicly accessible.
Security
Security in AWS follows a shared responsibility model. AWS is responsible for the security of the cloud (physical devices, data centers, etc.). You are responsible for security in the cloud. This includes the security configuration of the operating systems, the AWS account itself, and database systems.
- The solution deployed already is following best practices for security in the AWS services such as VPC, EC2, and RDS. The EC2 instances are not publicly available, and can only be accessed through the use of a RDGW server that has been deployed into the environment.
- The passwords for your environment are stored in a secure string through the AWS Systems Manager Parameter Store.
- The database is encrypted at-rest using the AWS Key Management Service (KMS). Backups of the database are configured automatically via AWS RDS Snapshots. The solution will keep seven days of backups, and encrypt the backup as well.
- You should ensure that you have downloaded the SSH Private Key file from S3. This file is to be treated as any secure file your organization manages. Please see Step 7 in the Deployment steps for instructions on performing this operation.
- You should ensure that your AWS account is configured to use the AWS CloudTrail service, as well as the AWS Config service. Enabling both of these services follows the best practices for security in AWS. As part of the shared-responsibility security model of AWS, it is your responsibility to protect the account and configure these two services.
- The solution will use the latest, patched Windows 2019 AMI when launching an environment.
- For non-production environments, you are responsible for applying updates to the Windows instances through the standard Windows Update processes in the operating system. Please note that anytime that you launch a new non-production environment, however, the operating system will be the latest patched image available at that time.
- It is highly recommended that you become familiar with AWS Security best practices to ensure that you understand how to secure your AWS account and resources. Further information on these best practices can be found here