How To: Extend the Ed-Fi ODS / API - Student Transcript Example
In this example, we will create a new domain entity called Student Transcript. This entity will be exposed in Ed-Fi ODS / API through a new API resource called studentTranscripts.
Before you begin:
- This example uses MetaEd to generate extended artifacts and documentation. MetaEd is a free tool developed by the Ed-Fi Alliance, and is the recommended way to add new fields to the Ed-Fi ODS / API. You should download and install MetaEd before beginning. If you prefer to generate extended artifacts manually instead of using MetaEd, steps are listed in Appendix A of this page.
- This example assumes knowledge of the basic concepts described in the How To: Extend the ODS / API - Alternative Education Program Example. If you're new to the Ed-Fi technology stack, or if you haven't used MetaEd before, then we suggest you run through that example first.
- This example assumes that the Ed-Fi ODS / API has been successfully downloaded and is running in a local development environment per the instructions in the Getting Started documentation.
- Back up any existing code or scripts, either in source control or on your file system. This is important if you or your team have performed these steps before. The MetaEd deployment feature replaces existing files, some of which may contain hand-crafted customizations (e.g., to define an authorization strategy).
Step 1. Design Your Extension
In a real project, you would take the preliminary step of designing your extension, and analyzing how your needs map to the Ed-Fi ODS / API data model. We'll propose a design.
This example will create a new Student Transcript entity, which will carry information about where students enroll in college after graduation, a new element indicating whether graduates were part of a special education program, and some additional information about whether a transmitted record is an official or unofficial submission.
Based on our needs, we require a new entity (to contain information about postsecondary institutions) and we need to add some elements to existing entities. The following diagram is a sketch showing the additional entity and the new elements we're bolting on to existing Ed-Fi entities.
You'll notice that a few elements are shown with a type of "descriptor." The Ed-Fi Descriptor is analogous to an enumeration. It's an Ed-Fi-specific design pattern that allows for enumeration-like definition and validation within an operational context, but may vary between contexts. We'll see more about how these are implemented below.
This example is somewhat complex, but illustrates most of the advanced concepts required to extend the Ed-Fi ODS / API. Let's continue with the mechanics.
Step 2. Author Your Extension Using MetaEd
In this step, we'll create a new project in MetaEd, and author our new entity. You do need to download and install MetaEd to do this step. Do that now if you haven't already.
Step 2a. Set or Confirm MetaEd Target Version
MetaEd allows you to target different versions of the Ed-Fi technology stack and data model. Confirm that your MetaEd IDE is targeting v7.2 by following the instructions in the Version Targeting documentation for the MetaEd IDE.
The desired model for the latest ODS / API is "ed-fi-model-5.1".
Step 2b. Create a New Extension Project
Create a new extension by following the steps in MetaEd IDE - Creating and Maintaining Your Extension. In this example our extension is in a folder called "StudentTranscript"
Listing of files
StudentTranscript/
├─ Association/
├─ Choice/
├─ Common/
├─ Descriptor/
├─ Domain/
├─ DomainEntity/
├─ Enumeration/
├─ Interchange/
├─ Shared/
├─ package.json
Step 2c. Update the package.json File
Open the package.json file by double-clicking on the file in the tree view to the left and provide an appropriate name for your project. In this case we will call it "SampleStudentTranscript".
Click "Save" under the "File" menu or press Ctrl + S to save your changes.
{
  "metaEdProject": {
    "projectName": "SampleStudentTranscript",
    "projectVersion": "1.0.0"
  }
}
Step 2d. Add MetaEd Source Files to Your Project
We're going to add seven new .metaed source files to the project we just created. You'll recall that MetaEd files are required to be organized into subfolders named after their entity type. The core ed-fi-model project provides examples of subfolder naming.
2d.1. Add Domain Entities
Now we'll add two MetaEd source files to the DomainEntity folder. Right-click on the folder DomainEntity, and select New File.
Name the new file PostSecondaryOrganization.metaed to match the name of the
new entity to be created.
Note the new file appears in the tree view to the left. Double-click on the file in the tree view to open it. Type or copy and paste the code listing below into your MetaEd file:
Note that errors will be listed in the linter panel until the referenced Descriptors are created in a future step.
MetaEd Source for PostSecondaryOrganization Entity
Domain Entity PostSecondaryOrganization
    documentation "PostSecondaryOrganization"
    shared string EdFi.NameOfInstitution
        documentation "The name of the institution."
        is part of identity
    descriptor InstitutionLevel
        documentation "The level of the institution."
        is required
    descriptor InstitutionControl
        documentation "The type of control of the institution (i.e., public or private)."
        is required
    bool AcceptanceIndicator
        documentation "An indication of acceptance."
        is required
We'll now create a Domain Entity source file, called
StudentAcademicRecordExtension, to add our new elements to the existing
Student Academic Record entity. Note that we can extend an existing entity using
the additions keyword (line 1 in the example below).
MetaEd Source for StudentAcademicRecordExtensions Entity
Domain Entity EdFi.StudentAcademicRecord additions
    domain entity PostSecondaryOrganization
        documentation "A reference to the postsecondary organization."
        is optional
    descriptor SubmissionCertification
        documentation "The type of submission certification."
        is optional
    common extension EdFi.ClassRanking
        documentation "Class Ranking Extension"
        is optional
2d.2. Extend the Class Ranking
In this step, we'll extend the Class Ranking entity to add our new Special Education Graduation Status element. The steps are generally the same as the ones you used to add the domain entities above.
Right-Click on the Common folder, select New File. Name your new file
ClassRankingExtension.metaed.
Similar to how you extended the Student Academic Record domain entity above,
you'll extend the Class Ranking entity with the keyword additions. Replace the
template text in your new Common source file with the following code.
MetaEd Source for ClassRankingExtensions Common Type
Common EdFi.ClassRanking additions
    descriptor SpecialEducationGraduationStatus
        documentation "The graduation status for special education."
        is required
2d.3. Add the new Ed-Fi Descriptor entities
If you're new to Ed-Fi technology, it's worth understanding the Ed-Fi Descriptor pattern because it occurs throughout the model. In essence, Descriptors provide states, districts, vendors, and other platform hosts with the flexibility to use their own enumerations and code sets. A Descriptor is consistent within an operational context such as a single district, but may be different in another operational context.
Right-click on the Descriptor folder, select New File. We'll be adding
four Descriptor files in total. Name your first file
InstitutionControl.metaed.
Replace the template text in your new Descriptor source file with the following code.
MetaEd Source for InstitutionControl Descriptor
Descriptor InstitutionControl
    documentation "The type of control for an institution (e.g., public or private)."
Voilà! Almost done. Follow the steps above and add the remaining three Descriptors.
Add an InstitutionLevel.metaed file.
MetaEd Source for InstitutionLevel Descriptor
Descriptor InstitutionLevel
    documentation "The typical level of postsecondary degree offered by the institute."
Add a SpecialEducationGraduationStatus.metaed file.
MetaEd Source for SpecialEducationGraduationStatus Descriptor
Descriptor SpecialEducationGraduationStatus
    documentation "The graduation status for special education."
Add a SubmissionCertification.metaed file.
MetaEd Source for SubmissionCertification Descriptor
Descriptor SubmissionCertification
    documentation "The type of submission certification."
2d.4. Add the new Interchange file
If you want to bulk load this extension, you need to create an interchange file.
Right-click on the Interchange folder, select New File. Name your file
StudentTranscript.metaed. Replace the template text in your new Interchange
source file with the following code.
MetaEd Source for StudentTranscript Interchange
Interchange EdFi.StudentTranscript additions
  domain entity PostSecondaryOrganization
At this point, your project in the MetaEd IDE should look like the following:
Listing of files
StudentTranscript/
├─ Association/
├─ Choice/
├─ Common/
| ├─ ClassRankingExtensions.metaed
├─ Descriptor/
| ├─ InstitutionControl.metaed
| ├─ InstitutionLevel.metaed
| ├─ SpecialEducationGraduationStatus.metaed
| ├─ SubmissionCertification.metaed
├─ Domain/
├─ DomainEntity/
| ├─ PostSecondaryOrganizations.metaed
| ├─ StudentAcademicRecordExtension.metaed
├─ Enumeration/
├─ Interchange/
| ├─ StudentTranscript.metaed
├─ Shared/
├─ package.json
Step 3. Generate Extended Technical Artifacts Using MetaEd
In this step, we'll build our new MetaEd project. This is fairly straightforward.
Step 3a. Build Your Project
Click Build in the VS Code menu to generate artifacts.
Artifacts build successfully.
Step 3b. View MetaEd Output
You can expand the project in the tree view and click "MetaEdOutput" to explore generated artifacts. The artifacts include technical output such as SQL scripts and XSD used by the code generation, but also updated documentation such as data dictionaries that add your extension definitions to the ODS / API documentation.
Listing of files
StudentTranscript/
├─ Association/
├─ Choice/
├─ Common/
| ├─ ClassRankingExtensions.metaed
├─ Descriptor/
| ├─ InstitutionControl.metaed
| ├─ InstitutionLevel.metaed
| ├─ SpecialEducationGraduationStatus.metaed
| ├─ SubmissionCertification.metaed
├─ Domain/
├─ DomainEntity/
| ├─ PostSecondaryOrganizations.metaed
| ├─ StudentAcademicRecordExtension.metaed
├─ Enumeration/
├─ Interchange/
| ├─ StudentTranscript.metaed
├─ MetaEdOutput/                            <----- NEW DIRECTORY
| ├─ Documentation/
| ├─ EdFi/
| ├─ SampleStudentTranscript/
|   ├─ ApiMetadata/
|     ├─ ApiModel-EXTENSION.json
|   ├─ Database/
|   ├─ Interchange/
|   ├─ XSD/
├─ Shared/
├─ package.json
We'll look at how to use this MetaEd output in your code below. First, we'll need to set up our extension project in Visual Studio.
Step 4. Create Extension Project in ODS / API Solution
This step will create the C# Extension files necessary to build your extended solution. This step assumes you've successfully downloaded and can run the ODS / API in a local development environment per the instructions in the Getting Started documentation. Do that now if you haven't already.
Step 4a. Set Up the C# Project Template
Visual Studio Project Templates can be installed by following steps in Project Templates Installation section of this documentation.
Step 4b. Create new Extension Project
4b.1. Add a project to your Ed-Fi-Ods Visual Studio Solution
To add a project to your Ed-Fi-Ods Visual Studio Solution, right-click on the Ed-Fi Extensions Folder. Select Add > New Project.
4b.2
Search and select the Ed-Fi API Extensions Project Template option and Click Next.
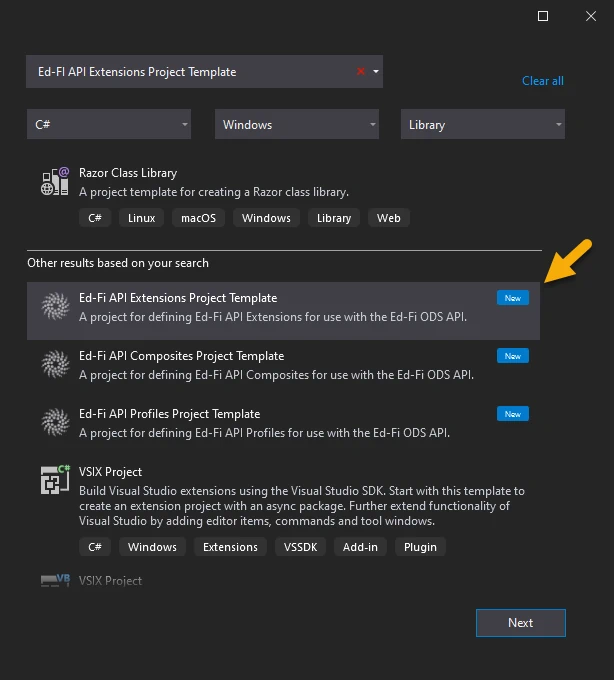
In the Project Name field,
enter EdFi.Ods.Extensions.SampleStudentTranscript and click Create.
To ensure MetaEd outputs are correctly deployed to ODS / API extension project, the last section of the project name should match the namespace you provided in Step 2.c with the first character in upper case.
Step 4c. Rename the "Marker" Interface file
4c.1. Rename the "Marker" Interface file
Right-click on the Marker_EdFi_Ods_Extensions_ExtensionName.cs file
in newly created EdFi.Ods.Extensions.SampleStudentTranscript project and
Rename the file to Marker_EdFi_Ods_Extensions_SampleStudentTranscript.cs.
file to Marker_EdFi_Ods_Extensions_SampleStudentTranscript.cs.
4c.2. When prompted choose to rename all references to the code
element Marker_EdFi_Ods_Extensions_ExtensionName.
Step 4d. Integrate Extension into the Solution
In this step, we'll integrate the extension into the solution.
4d.1
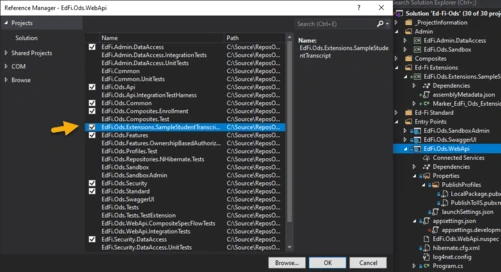
Locate the EdFi.Ods.WebApi project, within the "Entry Points" folder. Right-click, select Add > Project Reference..., then select the EdFi.Ods.Extensions.SampleStudentTranscript project.
4d.2
Locate any profile projects in the solution. Right-click, select Add > Project Reference..., then select the EdFi.Ods.Extensions.SampleStudentTranscript project. This step is needed only if any of the Profile resources in the Profiles.xml document are extended, or extension entities are being constrained by a particular Profile.
Step 5. Deploy your Extended Artifacts to the ODS / API Solution
In this step, we'll use the MetaEd "Deploy" feature and integrate the files you've generated with the ODS / API Solution. The MetaEd IDE can deploy the generated artifacts necessary for an ODS / API build of an extension project. These include the generated SQL, generated XSD, and other material.
You can easily configure the MetaEd IDE to copy the generated files to the correct locations for the ODS / API project.
Step 5a. Confirm MetaEd Deployment Settings
Ensure that your Ed-Fi ODS / API source directory is set properly in the MetaEd Extension settings. In VS Code open Settings Ctrl+, and switch to the Workspace tab, find the MetaEd extension and update the "Ods Api Deployment Directory" to point to the folder that contains the Ed-Fi-ODS and Ed-Fi-ODS-Implementation folders.
Step 5b. Deploy Your Extended Artifacts
As noted above, deployment will remove existing SQL scripts — including modifications to establish the authorization strategy as described in the next step. Verify that you have a source control copy or file backup of previous work before running deployment.
Deploy by clicking the Deploy button in the upper right corner of the window (must have a file open, otherwise the button is not displayed).
This will run a new build of all artifacts, and the artifacts required for your Extended ODS / API project will be copied over to the correct locations.
For instructions on how to perform the steps manually, see Appendix A, below.
Step 6. Configure Security
The Ed-Fi ODS / API is secure by default. One implication of this design principle is that new entities and elements may not be accessed until an authorization strategy is applied. This prevents accidental release of confidential information, but does require active steps on the part of system developers to enable access to Extensions.
PostSecondaryOrganization has no relationship to people or education organizations and therefore has no authorization strategy that can be applied to it. In effect, it is a standalone table and will need an authorization strategy of "NoFurtherAuthorizationRequired" for API requests to be made against it. If security is desired, another authorization strategy could be implemented to handle this entity.
To enable NoFurtherAuthorizationRequired, first create a security SQL script
called 0001-PostSecondaryOrganization_No_Further_Auth_Required.sql and place
it in
the Ed-Fi-ODS-Implementation\Application\EdFi.Ods.Extensions.SampleStudentTranscript\Versions\1.0.0\Standard\5.1.0\Artifacts\MsSql\Data\Security folder
(Create 'Security' folder if it does not exist). Copy the contents of the
following SQL DML script into the newly created file and save.
0001-PostSecondaryOrganization_No_Further_Auth_Required.sql
DECLARE @SystemDescriptorsId INT

SELECT @SystemDescriptorsId = resourceclaimid
FROM   [dbo].[resourceclaims]
WHERE  resourcename = 'systemDescriptors'

INSERT INTO [dbo].[resourceclaims]
            ([resourcename],
             [claimname],
             [parentresourceclaimid])
VALUES      ('institutionControlDescriptor',
'http://ed-fi.org/ods/identity/claims/sample-student-transcript/institutionControlDescriptor',
@SystemDescriptorsId)

INSERT INTO [dbo].[resourceclaims]
            ([resourcename],
             [claimname],
             [parentresourceclaimid])
VALUES      ('institutionLevelDescriptor',
              'http://ed-fi.org/ods/identity/claims/sample-student-transcript/institutionLevelDescriptor',
              @SystemDescriptorsId)

INSERT INTO [dbo].[resourceclaims]
            ([resourcename],
             [claimname],
             [parentresourceclaimid])
VALUES      ('specialEducationGraduationStatusDescriptor',
'http://ed-fi.org/ods/identity/claims/sample-student-transcript/specialEducationGraduationStatusDescriptor',
@SystemDescriptorsId)

INSERT INTO [dbo].[resourceclaims]
            ([resourcename],
             [claimname],
             [parentresourceclaimid])
VALUES      ( 'submissionCertificationDescriptor',
'http://ed-fi.org/ods/identity/claims/sample-student-transcript/submissionCertificationDescriptor',
@SystemDescriptorsId )

INSERT INTO [dbo].[ResourceClaims] (
     [ResourceName]
    ,[ClaimName]
    ,[ParentResourceClaimId])
VALUES (
    'postSecondaryOrganization'
    ,'http://ed-fi.org/ods/identity/claims/sample-student-transcript/postSecondaryOrganization'
    ,NULL
    )

--Setup Authorization Strategy

DECLARE @AuthorizationStrategyId INT
DECLARE @ResourceClaimId INT

SELECT @AuthorizationStrategyId = AuthorizationStrategyId
FROM AuthorizationStrategies
WHERE AuthorizationStrategyName = 'NoFurtherAuthorizationRequired'

SELECT @ResourceClaimId = resourceclaimid
FROM ResourceClaims
WHERE ResourceName = 'postSecondaryOrganization'

INSERT INTO [dbo].[ResourceClaimActions] (
    [ResourceClaimId]
    ,[ActionId]
    ,[ValidationRuleSetName]
    )
SELECT ResourceClaimId, a.ActionId, null
FROM [dbo].[ResourceClaims]
CROSS APPLY (
    SELECT ActionId
    FROM [dbo].[Actions]
    WHERE ActionName IN ('Create', 'Read', 'Update', 'Delete', 'ReadChanges')) AS a
WHERE ResourceClaimId = @ResourceClaimId

INSERT INTO [dbo].[ResourceClaimActionAuthorizationStrategies] (
    [ResourceClaimActionId]
    ,[AuthorizationStrategyId]
    )
SELECT ResourceClaimActionId, @AuthorizationStrategyId
FROM [dbo].[ResourceClaimActions] rca
INNER JOIN [dbo].[ResourceClaims] rc
    ON rca.[ResourceClaimId] = rc.[ResourceClaimId]
INNER JOIN [dbo].[Actions] a
    ON rca.ActionId = a.Actionid
        AND a.ActionName IN ('Create','Read','Update','Delete', 'ReadChanges')
WHERE rc.ResourceClaimId = @ResourceClaimId

--Add to SIS Vendor and Ed-Fi Sandbox claim sets
INSERT INTO [dbo].[ClaimSetResourceClaimActions]
SELECT [ClaimSetId]
    ,[ResourceClaimId]
    ,[ActionId]
    ,NULL
FROM Actions a
    ,ClaimSets c
    ,ResourceClaims r
WHERE r.ResourceName = 'postSecondaryOrganization'
    AND (
        c.ClaimSetName = 'SIS Vendor'
        OR c.ClaimSetName = 'Ed-Fi Sandbox'
        )
    AND NOT EXISTS (
        SELECT 1
        FROM ClaimSetResourceClaimActions csrca
        WHERE csrca.ActionId = a.ActionId
            AND csrca.ClaimSetId = c.ClaimSetId
                 AND csrca.ResourceClaimId = r.ResourceClaimId
        )
Preventing Resource Name Conflicts
With MetaEd 2+, it is possible to create extension resources that use the same name as an Ed-Fi Data Standard resource. The authorization metadata supports this through a change in behavior so it no longer uses just the resource name to identify the resource, but instead uses the ClaimName. To prevent possible naming conflicts, the claim name's URI value should include the schema representation, using the following format:
http://ed-fi.org/ods/identity/claims/{schema}/{resourceName}
The URI representation of the schema name should be derived by splitting the terms in the name of the extension, inserting hyphens and converting to lower case. For example, "SampleStudentTranscript" would be separated into "Sample", "Student" and "Transcript" and then combined with hyphens and converted to lower case as "sample-student-transcript".
The resource name should be the camel-cased (also known as "medial capitals"), singularized name of the resource (e.g., "postSecondaryOrganization" not "PostSecondaryOrganization" or "postSecondaryOrganizations").
Note that in 0001-PostSecondaryOrganization_No_Further_Auth_Required.sql
script above, the resulting ClaimName value is
"http://ed-fi.org/ods/identity/claims/sample-student-transcript/postSecondaryOrganization"
Step 7. Run Code Generation and Verify Changes
Save all modified files, close Ed-Fi-ODS.sln, and re-run the code generation
steps outlined in the Getting Started
Guide (i.e.,
from a PowerShell prompt run Initialize-PowershellForDevelopment.ps1 script,
followed by the initdev command). Then, run the application and view the Ed-Fi
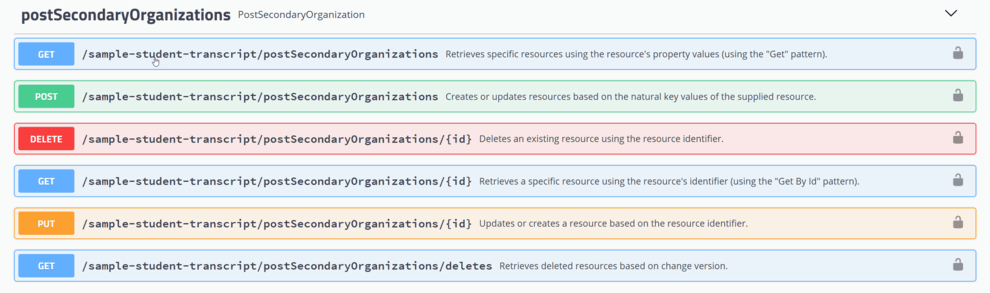
ODS / API in the Swagger UI.
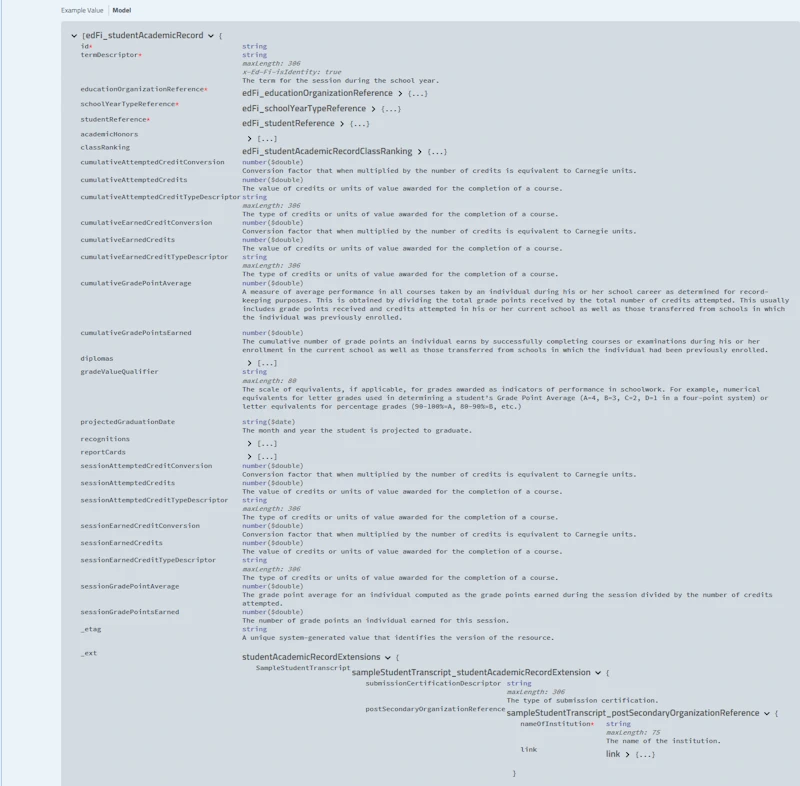
The new postSecondaryOrganizations API resource should be visible, as well as the postSecondaryOrganizationReference in the studentAcademicRecord resource.
Next Steps & Further Information
Congratulations, you've successfully extended an instance of the Ed-Fi ODS / API.
The Ed-Fi Extension in this example is fairly simple. It's a good place to start, but most enterprise users have more complicated needs. The MetaEd Cookbook documentation provides excellent additional examples of common scenarios, from the simple to very complex.
Appendix A: Adding Manually Created Extensions
Step A1. Set Up the C# Project Template
Visual Studio Project Templates can be installed by following steps in Project Templates Installation section of this documentation.
Step A2. Create new Extension Project
A2.1
To add a project to your Ed-Fi-Ods Visual Studio Solution, right-click on the Ed-Fi Extensions Folder. Select Add > New Project.
A2.2
Search and select the Ed-Fi API Extensions Project Template option and click Next.
In the Project Name field,
enter EdFi.Ods.Extensions.SampleStudentTranscript and
click Create.
Step A3. Rename the "Marker" Interface File
3.1. Right-click on
the Marker_EdFi_Ods_Extensions_ExtensionName.cs file in newly
created EdFi.Ods.Extensions.SampleStudentTranscript project and Rename the
file to Marker_EdFi_Ods_Extensions_SampleStudentTranscript.cs.
3.2. When prompted choose to rename all references to the code
element Marker_EdFi_Ods_Extensions_ExtensionName.
Step A4. Integrate Extension into the Solution
In this step, we'll integrate the extension into the solution.
A4.1
Locate the EdFi.Ods.WebApi project, within the "Entry Points" folder. Right-click, select Add > Reference..., then select the EdFi.Ods.Extensions.SampleStudentTranscript project.
A4.2
Locate any profile projects in the solution. Right-click, select Add > Project Reference..., then select the EdFi.Ods.Extensions.SampleStudentTranscript project. This step is needed only if any of the Profile resources in the Profiles.xml document are extended, or extension entities are being constrained by a particular Profile.
Step A5. Add Extension Metadata
If you chose to generate Extension artifacts manually, copy them to Artifacts folder of Extension project you created in the previous step. For the purpose of this example we can use MetaEd Generated Extension Artifacts from the Download section.
Open command prompt and navigate to root of the ODS / API repository on your local drive. This is the folder that contains both Ed-Fi-ODS and Ed-Fi-ODS-Implementation repositories. Run the following copy commands:
xcopy /y "Ed-Fi-ODS\Samples\Extensions\StudentTranscript\StudentTranscriptMetaEd\MetaEdOutput\SampleStudentTranscript\Database\SQLServer\ODS\Structure" `
  "Ed-Fi-ODS-Implementation\Application\EdFi.Ods.Extensions.SampleStudentTranscript\Versions\1.0.0\Standard\5.1.0\Artifacts\MsSql\Structure\Ods\*"

xcopy /y "Ed-Fi-ODS\Samples\Extensions\StudentTranscript\StudentTranscriptMetaEd\MetaEdOutput\SampleStudentTranscript\Database\PostgreSQL\ODS\Structure" `
  "Ed-Fi-ODS-Implementation\Application\EdFi.Ods.Extensions.SampleStudentTranscript\Versions\1.0.0\Standard\5.1.0\Artifacts\PgSql\Structure\Ods\*"

xcopy /y "Ed-Fi-ODS\Samples\Extensions\StudentTranscript\StudentTranscriptMetaEd\MetaEdOutput\SampleStudentTranscript\ApiMetadata" `
  "Ed-Fi-ODS-Implementation\Application\EdFi.Ods.Extensions.SampleStudentTranscript\Versions\1.0.0\Standard\5.1.0\Artifacts\Metadata\*"

xcopy /y "Ed-Fi-ODS\Samples\Extensions\StudentTranscript\StudentTranscriptMetaEd\MetaEdOutput\SampleStudentTranscript\XSD" `
  "Ed-Fi-ODS-Implementation\Application\EdFi.Ods.Extensions.SampleStudentTranscript\Versions\1.0.0\Standard\5.1.0\Artifacts\Schemas\*"

xcopy /y "Ed-Fi-ODS\Samples\Extensions\StudentTranscript\StudentTranscriptMetaEd\MetaEdOutput\SampleStudentTranscript\Interchange" `
  "Ed-Fi-ODS-Implementation\Application\EdFi.Ods.Extensions.SampleStudentTranscript\Versions\1.0.0\Standard\5.1.0\Artifacts\Schemas\*"
Step A6. Configure Security
The Ed-Fi ODS / API is secure by default. One implication of this design principle is that new entities and elements may not be accessed until an authorization strategy is applied. This prevents accidental release of confidential information, but does require active steps on the part of system developers to enable access to Extensions.
PostSecondaryOrganization has no relationship to people or education organizations and therefore has no authorization strategy that can be applied to it. It is in effect a standalone table and will need an authorization strategy of "NoFurtherAuthorizationRequired" for API requests to be made against it. If security is desired, another authorization strategy could be implemented to handle this entity.
To enable NoFurtherAuthorizationRequired, first create a security SQL script
called 0001-PostSecondaryOrganization_No_Further_Auth_Required.sql and
place it in the Ed-Fi-ODS-Implementation/Application/ EdFi.Ods.Extensions.SampleStudentTranscript/Versions/1.0.0/Standard/5.1.0/Artifacts/MsSql/Data/Security folder
(Create 'Security' folder if it does not exist). Copy the contents of the
following SQL DML script into the newly created file and save.
0001-PostSecondaryOrganization_No_Further_Auth_Required.sql
DECLARE @SystemDescriptorsId INT

SELECT @SystemDescriptorsId = resourceclaimid
FROM   [dbo].[resourceclaims]
WHERE  resourcename = 'systemDescriptors'

INSERT INTO [dbo].[resourceclaims]
            ([resourcename],
 = 'NoFurtherAuthorizationRequired'

SELECT @ResourceClaimId = resourceclaimid
FROM ResourceClaims
WHERE ResourceName = 'postSecondaryOrganization'

INSERT INTO [dbo].[ResourceClaimActions] (
    [ResourceClaimId]
    ,[ActionId]
    ,[ValidationRuleSetName]
    )
SELECT ResourceClaimId, a.ActionId, null
FROM [dbo].[ResourceClaims]
CROSS APPLY (
    SELECT ActionId
    FROM [dbo].[Actions]
    WHERE ActionName IN ('Create', 'Read', 'Update', 'Delete', 'ReadChanges')) AS a
WHERE ResourceClaimId = @ResourceClaimId

INSERT INTO [dbo].[ResourceClaimActionAuthorizationStrategies] (
    [ResourceClaimActionId]
    ,[AuthorizationStrategyId]
    )
SELECT ResourceClaimActionId, @AuthorizationStrategyId
FROM [dbo].[ResourceClaimActions] rca
INNER JOIN [dbo].[ResourceClaims] rc
    ON rca.[ResourceClaimId] = rc.[ResourceClaimId]
INNER JOIN [dbo].[Actions] a
    ON rca.ActionId = a.Actionid
        AND a.ActionName IN ('Create','Read','Update','Delete', 'ReadChanges')
WHERE rc.ResourceClaimId = @ResourceClaimId

--Add to SIS Vendor and Ed-Fi Sandbox claim sets
INSERT INTO [dbo].[ClaimSetResourceClaimActions]
SELECT [ClaimSetId]
    ,[ResourceClaimId]
    ,[ActionId]
    ,NULL
FROM Actions a
    ,ClaimSets c
    ,ResourceClaims r
WHERE r.ResourceName = 'postSecondaryOrganization'
    AND (
        c.ClaimSetName = 'SIS Vendor'
        OR c.ClaimSetName = 'Ed-Fi Sandbox'
        )
    AND NOT EXISTS (
        SELECT 1
        FROM ClaimSetResourceClaimActions csrca
        WHERE csrca.ActionId = a.ActionId
            AND csrca.ClaimSetId = c.ClaimSetId
                 AND csrca.ResourceClaimId = r.ResourceClaimId
        )
Step 7. Run Initdev
Save all modified files, close Ed-Fi-ODS.sln, and re-run the code generation
steps outlined in the Getting Started
Guide (i.e.,
from a PowerShell prompt run Initialize-PowershellForDevelopment.ps1 script,
followed by the initdev command). Then, run the application and view the Ed-Fi
ODS / API in the Swagger UI. The following new API resource should be visible:
The following GitHub links contain source files for this extensibility sample.